Houdini C++ HDK

This a first attempt at making a SOP node using Houdini’s C++ HDK. As shown in the video this creates a select number of points and offsets them by a fixed amount. not the most useful thing, but a good introduction to the libraries, and a nice refresher of C++.

Above is the header file for my “Point_HDK“ class. all the declaration of variables and functions appears here.

To the left is the implementation of the node containing functions for registering the node, creating the sop parameters, and the functionality while cooking the sop.

Car Commercial #6

Pebbles

This is the new pebble sim with varying sizes. The image to the left is the point attributes I set on the points. I use the @rand attribute to set the pscale.

I keep the @rand attribute on the sim geometry and then use a sop solver in the dop netwrok to then set the mass using the same rand attribute, meaning smaller the pscale smaller the mass.

this is the vex for the mass attribute :

@mass = fit(@rand,0,1,.25,1);

Pyro

This is the dop network for the pyro. It is very simple right now as I fell like the tractor beam forces would be fairly smooth for objects so light.I could also have a similar setup to the pebbles and add a ramp and noise to the gas wind which, if I fell it is lacking detail. If I decide to up the resolution of the sim I may add some more higher frequency turbulence within the sim as the force going up is fairly clean right now, as you can see in the video above..

The video above is the first render tests but I really did not like the result, the lift was far to consistent at the start and the there is no noise in the sim. The screen shots below are a new sim that I think I like better more noise and less consistent upwards force.

Car Commercial #5

Shot 1

This Week I primarily worked on shot 1. The shot consists of three main sims RBD pebbles, particles for larger dust, and Pyro for small aerosolized dust. This week I was able to get the timing down for the pebbles and particles, however the Pyro still needs work.

This is the DOP Network for the pebbles. The first SOP solver gives the pebbles a random mass

This is the vex code:
@mass = fit(rand(@ptnum),0,1,.25,1);

just assigns a random 0-1 value based on point number as a seed, then remaps it to mass values that makes the sim act the way I want.

The second sop solve just stops thing bullet objects from continually rolling

The POP wind (parameters shown above) is what gives the pebbles its motion. It uses this HScript expression:

if($F<1,0,(($FF+15)*.07) - fit(rand($FF),0,1,0,11))

everything behind the subtraction sign is to ramp the force up as the time increases, everything in front of the subtraction sign adding noise to the ramp.

The POP simulation is essentially the same setup but with some of the values tweaked.

Here are 2 very rough pyro sims to show off the possible shapes and motion of the dust

pyroTestLarge.gif
pyroTestSmall.gif

another thing that I worked on this week was simulated grass cards. Because we chose to shoot on a day that was not windy and there should be a giant UFO in the sky we need the background plate to have alot more motion in the long grass.

Grass

This is the setup for the grass sim. I copy stamp lines onto a grid of scattered points and randomize their length. Resample to make sure each blade has the same density of points because the more segments a line has the more floppy it is with vellum. I use a pin constraint on the bottom two points of each strand, then hair constraint and crank the bend stiffness. This is then fed into the DOP net with a vellum solver and a pop wind.

.ASS files

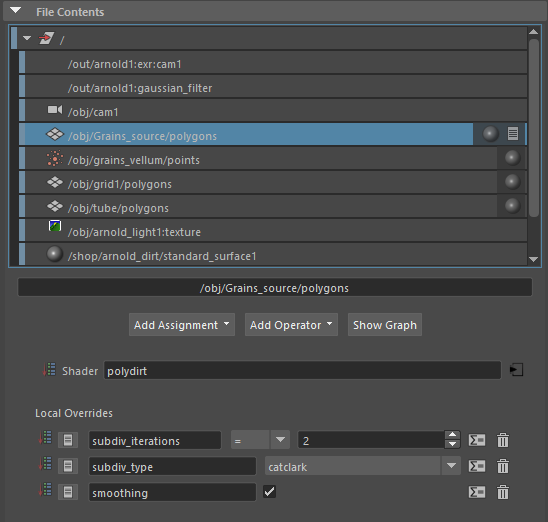
There are some more .ass tests, 1st is showing that you can also assign shaders in Maya, 2nd is showing that you can change the radius size of the particles in Maya, 3rd is showing that you can subdivide and smooth geometry. I was also able to add displacement to the geometry but I have not gotten a render of that as of yet. This is by far the most promising method we have found for moving geometry from Houdini to Maya and all the effects for the newest render were done using .ass files on the render farm.

showing parameters used for subdivision

showing parameters used for subdivision

showing parameters for particle radius

showing parameters for particle radius

Car Commercial #1

Soil FX reference

These are some of the videos that we are going to be working from when creating the soil FX. it is going to be a both asphalt and soil so making sure that we get a realistic version of both of these materials is going to be key.

This video is a great example of the characteristics of asphalt. the road is a combination of rocks and bitumen which is a substance that seems like a solid but is actually a highly viscous fluid. This combination makes it flexible but also tearable. I think this effect can be achieved through a RBD sim with hard constraints creating a “soft-body“ looking sim.

pitch drop video:

https://www.youtube.com/watch?v=SkpZAg4RkGI&t=24s

this is a great soil sim Peter Sanitra! There is a lvl 80 post out lining the general unspecific process he used and we will more than likely use this as a guide for the soil.

the general idea behind the soil sim is to make a RBD sim with hard constraints that are actually soft and allow some flex. Then create a Pop or Vellum grains sim that is sourced from when the RDB constraints break, and same for the pyro sim for the aerosolized dirt.

https://80.lv/articles/making-tree-soil-animation-in-houdini/